If you’ve ever pulled your boat out of storage in spring only to find the engine struggling—or worse, not starting at all—you already know how costly winter damage can be. Cold weather, leftover water inside the engine, and untreated fuel can quietly destroy an outboard motor over time. That’s why learning how to winterize outboard motor properly is not just a recommendation—it’s essential for protecting your investment.
Winterizing isn’t complicated, but it is something many boat owners delay or skip, often leading to expensive repairs later. Whether you use your boat for fishing, leisure, or weekend adventures, proper winter care ensures your engine stays reliable season after season.
In this guide, you’ll learn how to winterize outboard motor in a simple, step-by-step way that even beginners can follow with confidence. No confusing technical jargon—just clear, practical instructions based on real maintenance experience.
What Does Winterizing an Outboard Motor Mean?
When learning how to winterize outboard motor, the first thing to understand is what “winterizing” actually means in simple terms. In plain language, winterizing an outboard motor is the process of preparing your boat engine for cold-weather storage so it stays protected and works properly when you use it again. It’s basically like giving your engine a “winter shield” before it sits unused for months.
From real boating experience, I can say this step is often ignored by beginners—but it’s one of the most important things you can do to extend engine life.
Cold weather, moisture, and fuel-related issues are the main enemies of an outboard motor. When temperatures drop, any water left inside the engine or cooling system can freeze and expand. This can cause cracks, corrosion, or internal damage that is expensive to repair. Even a small amount of moisture can slowly build up rust on metal parts.
Fuel is another hidden problem. If untreated fuel sits in the tank for a long time, it can break down and form deposits or varnish. This can clog fuel lines, carburetors, and injectors, leading to poor performance or even engine failure when you start it again.
Moisture in the air also plays a big role. During winter storage, condensation builds up inside the engine and metal components. Over time, this leads to corrosion, especially if the motor is not properly protected.
That’s why understanding how to winterize outboard motor is not just a maintenance task—it’s essential protection. With proper winterizing, you’re preventing damage before it happens, saving money, and ensuring your boat is ready to run smoothly when boating season returns.
Tools and Materials You Will Need for Winterizing Your Outboard Motor
If you’re learning how to winterize outboard motor for the first time, the process can feel a bit technical. But the truth is, with the right tools and materials, it becomes simple, quick, and beginner-friendly. Most boat owners can complete the job at home without advanced mechanical skills—just a little preparation and care.
Fuel Stabilizer
A fuel stabilizer is essential because it prevents gasoline from breaking down during long storage. Without it, fuel can turn stale, clog the system, and cause starting problems in spring. Adding stabilizer is one of the most important steps in how to winterize outboard motor properly.
Fogging Oil
Fogging oil protects the internal engine parts from rust and corrosion. It coats the cylinders and prevents moisture damage during cold months. This small step can significantly extend your motor’s life and improve performance after storage.
Fresh Water Flush Kit
A flush kit helps you clean salt, dirt, and debris from the cooling system. Running fresh water through the motor ensures no harmful residue is left behind before storage. This is especially important if you use your boat in saltwater.
Basic Hand Tools
You don’t need a professional workshop—just basic tools like screwdrivers, pliers, and wrenches. These help with removing covers, checking parts, and performing simple maintenance tasks during the winterizing process.
Storage Cover
A good-quality storage cover protects your outboard motor from dust, rain, and moisture. It also prevents UV damage if the boat is stored outdoors. Think of it as the final shield in how to winterize outboard motor properly.
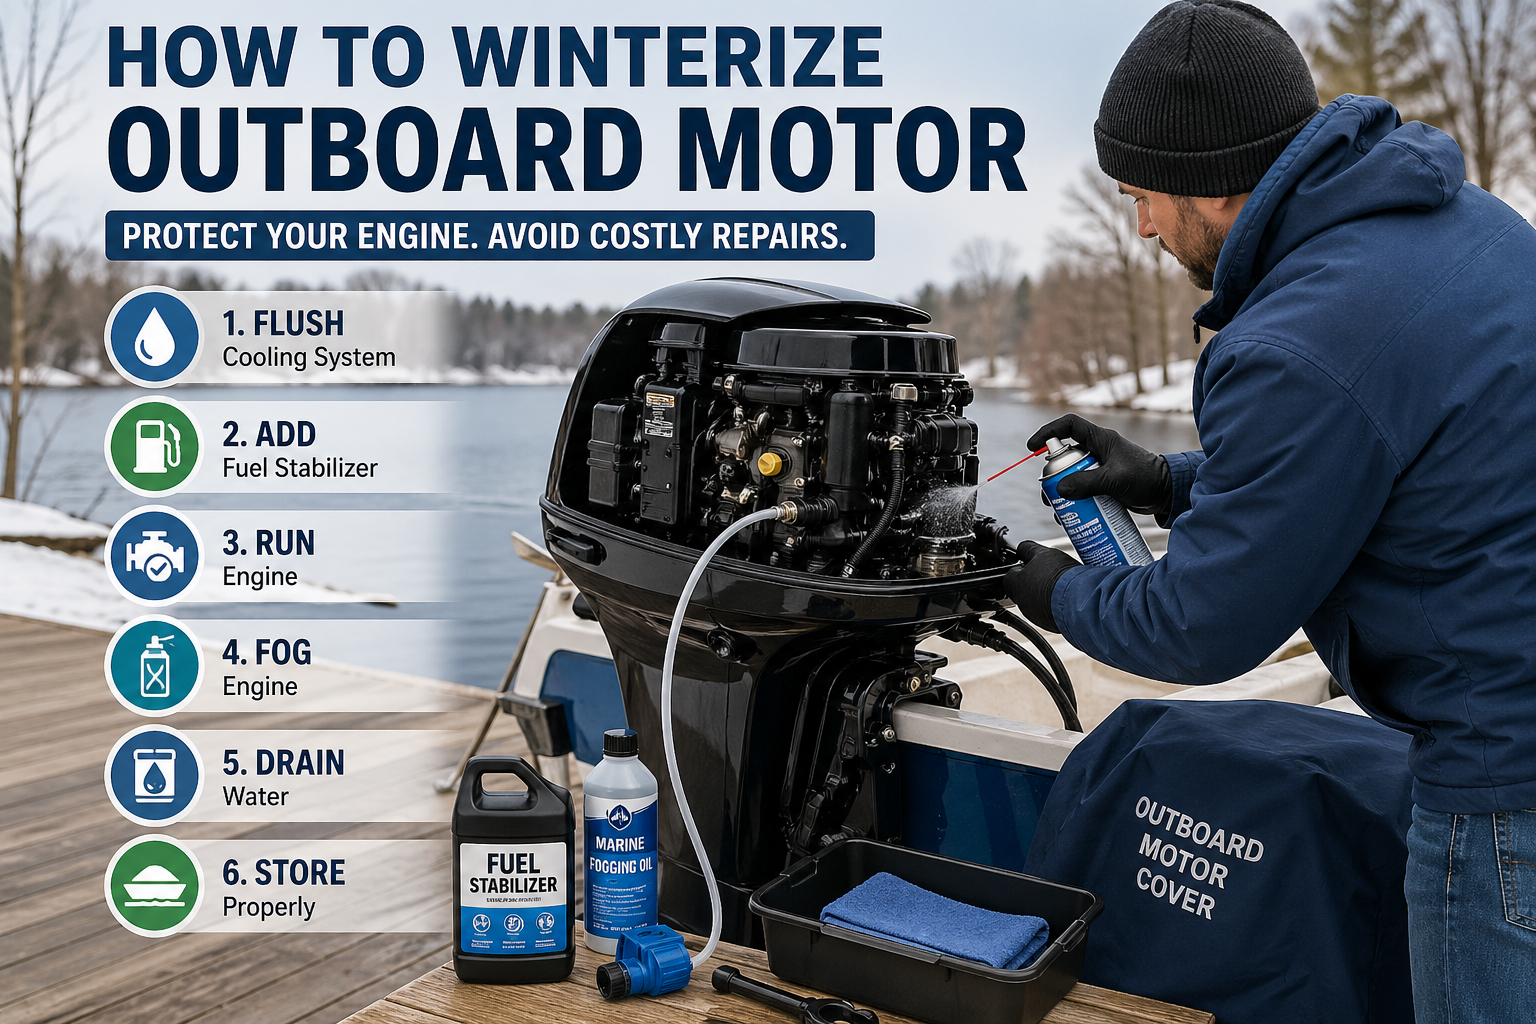
Step-by-Step Guide: How to Winterize Outboard Motor (Simple & Reliable Method)
If you own a boat, learning how to winterize outboard motor is one of the most important maintenance tasks you can do before cold weather arrives. Proper winterizing helps prevent engine damage, fuel issues, and costly repairs when boating season returns.
Below is a simple, trusted step-by-step guide you can follow.
Step 1: Clean and Inspect the Motor
Start by thoroughly cleaning your outboard motor. Remove dirt, salt, and debris. Then inspect for cracks, loose bolts, or corrosion. Early detection helps avoid bigger problems later.
Step 2: Flush the Cooling System
Connect a flush kit and run fresh water through the cooling system. This removes salt and contaminants that can cause internal corrosion during winter storage.
Step 3: Add Fuel Stabilizer
Pour a high-quality fuel stabilizer into your fuel tank. This keeps fuel fresh and prevents clogging in the carburetor or fuel injectors during long storage periods.
Step 4: Run Engine to Circulate Treated Fuel
Run the engine for a few minutes so the stabilized fuel moves through the entire fuel system. This ensures full protection.
Step 5: Apply Fogging Oil
Spray fogging oil into the air intake while the engine is running. This protects internal engine parts from rust and moisture damage.
Step 6: Drain Water and Protect Engine Parts
Turn off the engine and drain any remaining water. Wipe down metal parts and apply anti-corrosion spray where needed.
Step 7: Proper Storage Positioning
Store the motor in a vertical position in a dry, covered area. This prevents water buildup and protects internal components.
Common Mistakes to Avoid When Learning How to Winterize Outboard Motor
If you’re trying to understand how to winterize outboard motor, it’s just as important to know what not to do. Many boat owners unintentionally damage their engines during winter storage simply because they skip a few critical steps. Avoiding these common mistakes can save you from costly repairs and extend your motor’s lifespan.
1. Forgetting Fuel Treatment
One of the biggest mistakes is leaving untreated fuel in the tank. Without a fuel stabilizer, gasoline can break down over time, leading to gum buildup and clogged fuel lines. Always add a quality fuel stabilizer and run the engine for a few minutes so it circulates properly throughout the system.
2. Skipping the Fogging Process
Fogging oil is essential for protecting internal engine parts from rust and corrosion. Skipping this step leaves metal components exposed to moisture during storage. This is a critical step in how to winterize outboard motor properly, especially in humid or cold climates.
3. Improper Storage Cover Usage
Many boat owners think any cover will do, but that’s a mistake. A poor-quality or loosely fitted cover allows dust, moisture, and pests to enter. Always use a breathable, water-resistant cover designed specifically for marine engines.
4. Not Draining Water Completely
Water left inside the cooling system can freeze and expand, causing serious internal damage. Always ensure the engine is fully drained before storage. Even small amounts of leftover water can lead to cracked components.
Expert Tips for Long-Term Engine Health
If you’ve already learned how to winterize outboard motor, the next step is making sure your engine stays healthy year after year. Proper winterization is just one part of long-term care—consistent maintenance and smart storage choices matter just as much. These expert-backed tips will help you avoid costly repairs and keep your outboard motor running smoothly for seasons to come.
Annual Maintenance Checklist
A simple yearly routine can significantly extend your engine’s life. Before and after each boating season, make sure you:
- Change engine oil and gear oil
- Replace fuel filters and inspect fuel lines
- Check spark plugs for wear or corrosion
- Inspect the propeller for damage or fishing line wrap
- Flush the cooling system thoroughly
Following this checklist not only improves performance but also reduces the risk of breakdowns during use.
When to Call a Professional
Even if you know how to winterize outboard motor, some issues require expert attention. Call a certified marine technician if you notice:
- Persistent starting problems
- Overheating even after maintenance
- Unusual engine noises or vibration
- Fuel system leaks or electrical issues
Professionals have diagnostic tools and experience that can prevent small issues from turning into expensive repairs.
Best Storage Environment Recommendations
Proper storage is critical for engine longevity. Always store your outboard motor in a:
- Dry, well-ventilated space
- Covered area protected from rain and snow
- Position that keeps the motor upright or as recommended by the manufacturer
- Environment away from direct sunlight and extreme humidity
Using a high-quality cover adds an extra layer of protection against dust, moisture, and corrosion.
FAQ
1. Why is it important to winterize an outboard motor?
Winterizing protects your engine from freezing temperatures, internal corrosion, and fuel system damage. Without proper care, even a short cold season can lead to costly repairs.
2. When should I winterize my outboard motor?
It’s best to start the process before the first freezing temperature arrives. Ideally, winterize your motor at the end of boating season when you know you won’t be using it regularly.
3. Can I learn how to winterize an outboard motor myself?
Yes, most boat owners can do it themselves by following a clear step-by-step guide. Basic tools, fuel stabilizer, and fogging oil are usually enough for proper winterization.
4. How long does winterizing take?
On average, it takes 1–2 hours, depending on your experience and engine size. Taking your time ensures every step is done correctly.
5. What happens if I skip winterization?
Skipping winterization can lead to engine freezing, fuel system clogging, and internal damage. These issues often result in expensive repairs or even full engine replacement.
Conclusion
Winter can be one of the harshest seasons for your boat, and skipping proper care can lead to serious and expensive engine problems. That’s why understanding how to winterize outboard motor is not just helpful—it’s essential for every boat owner who wants long-term performance and reliability.
When water sits inside your engine during freezing temperatures, it can expand and cause cracks, corrosion, or complete mechanical failure. Fuel can also degrade, leading to clogged systems and difficult startups in the spring. A few simple winterization steps today can save you from major repair bills tomorrow.
By following a proper winterizing routine, you’re not just protecting your engine—you’re protecting your investment. Regular maintenance ensures smoother performance, longer engine life, and fewer unexpected breakdowns when boating season returns. From fuel treatment to proper storage, each step plays a critical role in keeping your motor in top condition.